VS Code 中建立文件模板
2019年9月3日...大约 3 分钟
做前端开发的同学都知道,我们在编辑器中输入一个 ! 然后按下 tab 键就可以帮我们自动补全 html 结构,那么当我们写 Vue 或者是 React 的时候,页面其实都是有一个初始模板的,我们要怎样做到类似上面简单输入就可以得到文件模板呢,今天就以 Vue 为模板举栗给大家介绍 VSCode 上的一个很好用的功能,叫做 用户代码片段。
文件模板创建详解
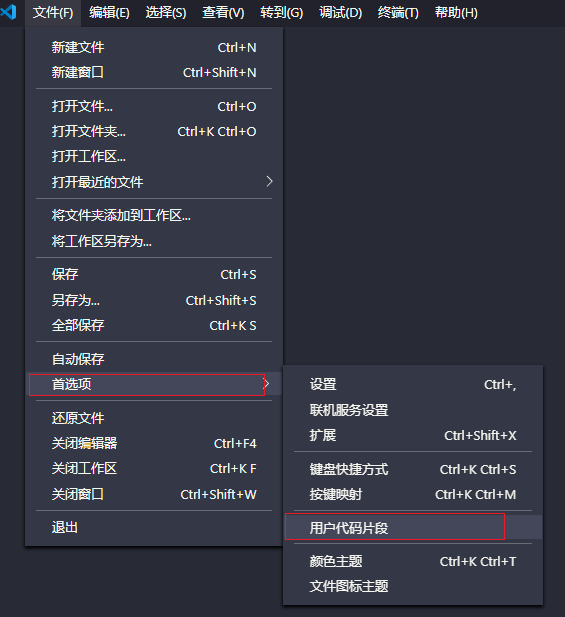
首先我们选择 文件--> 首选项 --> 用户代码片段

输入 Vue ,在下拉中选择 Vue.json

将文件中的代码覆盖为(注释中的内容可以去掉,在编辑器中鼠标悬浮在对象的键上就可以看到这些提示啦)
{
	"Print to console": {
			"prefix": "vue", // 在 Intellisense 中选择代码片段时将使用的前缀
			"body": [
					"<template>",
					"  <div>template</div>",
					"</template>",
					"",
					"<script>",
					"export default {",
					"  name: '',",
					"  data () {",
					"    return {",
					"",
					"    }",
					"  },",
					"  mounted () {",
					"",
					"  },",
					"  methods: {",
					"",
					"  }",
					"}",
					"</script>",
					"",
					"<style lang=\"less\" scoped>",
					"",
					"</style>",
					"$2"
			],
			"description": "Vue模板" // 代码片段描述。
	}
}
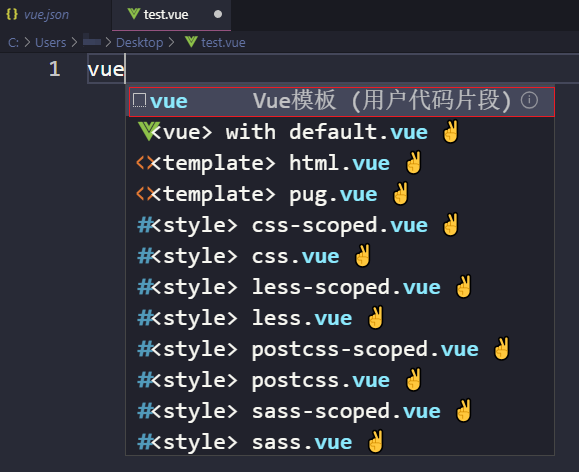
然后新建一个 Vue 文件,输入 vue ,选择我们刚才创建的模板,一般是下拉里面的第一个,然后我们的文件模板就生成好啦

生成效果
<template>
  <div>template</div>
</template>

<script>
export default {
  name: '',
  data () {
    return {

    }
  },
  mounted () {

  },
  methods: {

  }
}
</script>

<style lang="less" scoped>

</style>
同样的,我们可以根据上述语法片段来创建我们自己的文件模板,比如项目中自定义的 api 文件等
删除代码片段
通过打开的代码片段json文件,右键选择在 finder 中打开,直接在文件夹中删掉对应文件即可。为文件夹创建的代码片段在文件夹下的 .vscode 文件夹中。
代码片段未生效的可能解决办法
- md 文件中不生效,在
settings.json中添加一段"[markdown]": { "editor.quickSuggestions": true } - 如果你建立的是特定文件的代码片段,看看编辑器右下角识别的文件类型是否符合你的预期
- 网上还有说要将设置中的
editor.suggest.snippetsPreventQuickSuggestions置为 false ,我并未用到,关于这项配置可以看看 这篇文章 给出的解析 - 被已有代码提示挤到底下了,设置
"editor.snippetSuggestions": "top"来保持自己的代码片段在最上方
文件模板汇总
整理一下常用的文件模板,方便查询使用, vue 的在上面,我就不重复添加了
cml 文件(Chameleon 多端统一框架)
{
	"Print to console": {
			"prefix": "cml",
			"body": [
					"<template>",
					"  <view>Hello Chameleon!</view>",
					"</template>",
					"",
					"<script>",
					"",
					"class Template   {",
					"",
					"  data = {",
					"  }",
					"",
					"  computed = {",
					"  }",
					"",
					"  watch = {",
					"  }",
					"",
					"  methods = {",
					"  }",
					"",
					"  beforeCreate() {",
					"  }",
					"",
					"  created() {",
					"  }",
					"",
					"  beforeMount() {",
					"  }",
					"",
					"  mounted() {",
					"  }",
					"",
					"  beforeDestroy() {",
					"  }",
					"",
					"  destroyed() {",
					"  }",
					"",
					"}",
					"",
					"export default new Template();",
					"</script>",
					"",
					"<style lang=\"less\">",
					"",
					"</style>",
					"",
					"<script cml-type=\"json\">",
					"{",
					"  \"base\": {",
					"    \"usingComponents\": {}",
					"  },",
					"  \"wx\": {",
					"    \"navigationBarTitleText\": \"index\",",
					"    \"backgroundTextStyle\": \"dark\",",
					"    \"backgroundColor\": \"#E2E2E2\"",
					"    ",
					"  },",
					"  \"alipay\": {",
					"    \"defaultTitle\": \"index\",",
					"    \"pullRefresh\": false,",
					"    \"allowsBounceVertical\": \"YES\",",
					"    \"titleBarColor\": \"#ffffff\"",
					"  },",
					"  \"baidu\": {",
					"    \"navigationBarBackgroundColor\": \"#ffffff\",",
					"    \"navigationBarTextStyle\": \"white\",",
					"    \"navigationBarTitleText\": \"index\",",
					"    \"backgroundColor\": \"#ffffff\",",
					"    \"backgroundTextStyle\": \"dark\",",
					"    \"enablePullDownRefresh\": false,",
					"    \"onReachBottomDistance\": 50",
					"  },",
					"}",
					"</script>",
					"$2"
			],
			"description": "cml模板"
	}
}
vue + class api + ts
{
	"Print to console": {
			"prefix": "tsvue",
			"body": [
					"<template>",
					"  <section>template</section>",
					"</template>",
					"",
					"<script lang=\"ts\">",
					"import { Vue, Component, Prop } from 'vue-property-decorator'",
					"// 通过 namespace 便捷引用 store",
					"// import { namespace } from 'vuex-class'",
					"// const SMatedStore = namespace('AutoMatedTests')",
					"",
					"// 注册组件",
					"// @Component({",
					"//    components: { xxComponent }",
					"// })",
					"@Component",
					"export default class XXX extends Vue {",
					"  // prop 数据",
					"  // @Prop({ type: Boolean, default: false }) loading!: boolean",
					"",
					"  // data 数据",
					"  uid: string | number = ''",
					"  flag = false",
					"",
					"  // 计算属性",
					"  get isTagSelected() {",
					"    return this.uid === '123'",
					"  }",
					"",
					"  // 将 store 相关挂载到当前实例",
					"  // @SMatedStore.State('totalInfo') totalInfo!: BasicObject",
					"  // @SMatedStore.Getter('isLogSelected') isLogSelected!: boolean",
					"  // @SMatedStore.Mutation('setMonitorStatus') setMonitorStatus!: Function",
					"",
					"  // 生命周期钩子",
					"  created() {}",
					"}",
					"</script>",
					"",
					"<style lang=\"less\" scoped>",
					"",
					"</style>",
					"$2"
			],
			"description": "Vue-TS模板"
	}
}
用的熟练了之后可以注释等辅助去掉,只留一个基础架子